Showing posts with label ankle sprain. Show all posts

Wednesday, January 25, 2012

Ankle Sprains - Ligaments And More


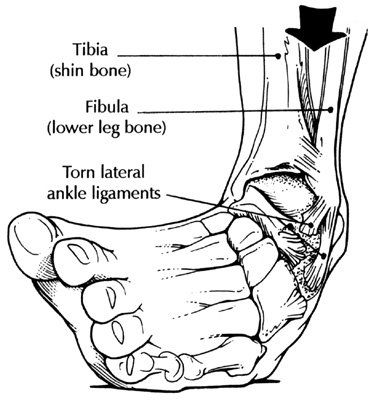
An ankle sprain refers to the tearing of the ligaments of the ankle and account for approximately 40% of all athletic injuries. 85% of ankle sprains occur on the outside (lateral side) of the ankle and are known as an inversion sprain. This is the type of injury that most runners experience when they sprain their ankles. Medial ankle sprains (along the inside of the ankle) occur less frequently and are usually caused by fractures or other traumatic events.
So, why is an inversion sprain so common? You can put it down to our lopsided anatomy! The bone on the lower outside of the ankle (the lateral malleolus - distal fibula) extends further down than the bone on the inside of the ankle (medial malleolusfibula). This difference gives the inside of the ankle (medial side) more stability than the outside of the ankle (lateral side).

At a symptomatic level, most ankle sprains appear to resolve completely without rehabilitation. In reality, ankle sprains that have not been rehabilitated correctly are usually susceptible to further injury.

Anatomy of an Ankle Sprain
The outside (lateral side) of the ankle achieves its stability from a three-ligament complex. These three ligaments are the:

In an inversion sprain, the Anterior Talofibular ligament (ATFL) is the most commonly injured. Ligaments in the ankle are named according to the bones to which they connect. In this case, the Anterior Talofibular ligament connects to the talus bone of the ankle as well as to a long bone of the lower leg - the fibula. The function of the ATFL is to prevent forward (anterior) displacement of the ankle (the talus).

In a severe ankle sprain another ligament called the calcaneofibular ligament (CFL) may also be damaged. This ligament connects your heel bone (calcaneous) with the fibula. This is a stronger ligament than the ATFL, and is not damaged as easily.

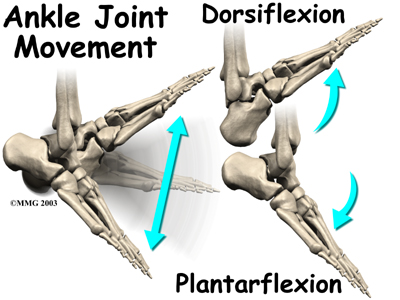
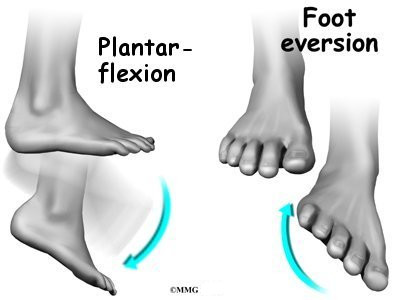
Both the ATFL and the CFL are usually damaged in motions where the foot is both pointed down (plantar flexed) and rolled out (inverted). Considerable instability in the ankle can occur when both these ligaments are injured.

The posterior talofibular ligament (PTFL) is not injured very often, except when there is a complete dislocation of the ankle (talus). The PTFL is the strongest ligament in the lateral complex.

Another sprain injury that is becoming more prevalent is called a “High Ankle Sprain” (syndesmotic ligament complex). In this injury, the ligament and connective tissue between your shin bones (tibia and fibula) are torn. This is a serious injury that may require surgery to resolve.

Not Just Ligaments
An ankle sprain may also result in damage to other structures. You may also experience damage to connective tissue, tendons, muscles further up the ankle, and even to the bones (possible fractures). This is why, with a severe ankle sprain, it is important to see a medical professional who can determine exactly which structures have been injured, and then provide treatment recommendations.

Treatment of Ankle Sprain
There are a number of things you can do to treat ankle injuries.

Just After The Injury
Immediately after spraining your ankle, it is important to do everything you can to reduce the swelling in the ankle. The faster you can implement treatment, the faster you will recover. An ankle sprain injury that is addressed quickly will often resolve in short period of time. If the injury is ignored, the ankle sprain could be prolonged for extensive periods of time.
So, immediately after the injury, while still in the acute stage - use RICE - rest, ice, compress, and elevate!
R = Rest: During this stage, it may be necessary to take all weight off of the injured ankle. In such cases, crutches are commonly used. In my opinion, it is important to quickly return to weight-bearing as soon as possible to improve healing. I have found that reintroduction of weight-bearing stresses tends to decrease recovery time. When should you do this? As soon as possible, but not too soon! Rest is also essential.
I = ICE : See our Blog about icing. Ice for at least 20 to 30, minutes 4 to 5 times per day to reduce swelling.
C = Compression: Compression (with an ACE wrap) reduces both swelling and bleeding. With a Grade 3 sprain, wear a brace at all times until you are able to bear weight on your ankle.
E = Elevation: Elevating the injured area acts to reduce swelling and bleeding.

Once you have used “RICE”, it is very important to introduce motion into the ankle as soon as possible. Depending on the degree of injury, the patient could be asked to perform gentle ankle circles, or if able to do so, write the alphabet with their feet. Light calf stretching and using a stationary bicycle may also be beneficial.

If you are going to use medication (NASID’s) to reduce inflammation, be sure not to use them for more than seven days. Using anti-inflammatory medications for long periods of time inhibits tissue remodeling. See our Blog about Recommendations to Reduce Inflammation without Medication.

Manual Therapy for an Ankle Sprain
Manual therapy can make a huge difference in the recovery and prevention of an ankle sprain. By manual therapy, I am referring to techniques such as Active Release, Graston Technique, Massage Therapy, Fascial Manipulation, Manual Manipulation, and other manual procedures. In my opinion, these procedures are essential in the rehabilitation of an ankle sprain since they all act to break down and prevent scar tissue formation.

Manual therapy also speeds healing by increasing blood supply, oxygen, essential nutrients, and displace waste products that accumulate after an injury. This is especially important in treating ligaments because they generally have a very poor blood supply to begin with.

It is Important to Treat More Than Just the Ligaments
Earlier, I mentioned that there might be damage to several types of structures after an ankle sprain, especially the connective tissue, tendons, muscles, and nerves. The following is list of structures that are often injured in a lateral ankle sprain (inversion sprain).

Ligaments
Anterior talofibular ligament (ATFL) – Most common injured structure.
Calcaneofibular ligament (CFL) – Second most commonly injured structure.
Tendons
o With an inversion sprain, it is common for the tendons of the peroneal muscles to be injured. It also common for the peroneal tendon to move out of its normal position (subluxate) during the recovery stage of an ankle sprain.
Muscles
Peroneus brevis muscle – Longitudinal tears of the peroneus brevis are commonly associated with lateral ankle sprains.
Peroneus longus muscle – These muscles often show a different activation pattern when there is ankle instability. This is often due to restrictions that have formed in the muscle. These restrictions, if not removed, could make a person more susceptible to future injuries.
Both muscles, evert the foot at the tarsal joint, and plantarflex the foot at the ankle.
Retinaculum
o During a lateral ankle sprain, the foot rolls inwards with considerable force. This forceful action can tear the peroneal retinaculum. This retinaculum is a band of connective tissue that keeps the peroneal tendons in place. When a tear in the retinaculum occurs, patients will notice a snapping sensation in the lateral ankle. Conservative treatment is 4 to 6 weeks in a short leg cast. However, a severe tear of the retinaculum is not a candidate for standard manual therapy and may require corrective surgery.
Nerves
Superficial peroneal nerve - This nerve is at risk for traction injury during a lateral ankle sprain (inversion sprain).

If you would like to more information or to purchase our books please go towww.releaseyourbody.com . 

If you would like information about our clinic in Calgary Alberta please go to www.kinetichealth.ca.


(COPYRIGHT KINETIC HEALTH 2012 – ALL RIGHTS RESERVED)


Wednesday, September 8, 2010

Ankle Sprain (Inversion Sprain) – Part 6


Restoring Flexibility to the Ankle
It is extremely important to stretch after experiencing an ankle injury of any kind. During the recovery phase, your body forms and lays down collagen to repair the injured area from two days, and up to 6 weeks after, the injury occurs.
If you suffer from an inversion sprain, and perform the correct stretching exercises, then you can ensure that the majority of the collagen that is being laid down, is being laid in the same direction as the tissue which is being repaired. This makes the repaired tissue stronger and more capable of performing its function in the future. However, if you do not stretch the injured area, the new collagen will be laid down in more random patterns, leading to the development of weaker tissue (scar tissue) that is easily re-injured

Here are some of the areas for which we recommend stretching exercises when our patients are recovering from an ankle injury:
Calf muscle (gastrocnnemius and soleus) - Stretch the calf muscle as it often becomes very tight after an ankle sprain, as these structures try to protect the injured joint.
Peroneal muscles – Stretch the peroneals (along the sides of your calf) as these muscles are often injured along with the ligaments in the ankles.
Iliotibial Band – Yes, these tissues are in your upper leg, but there are direct fascial connections from the peroneal muscles into the IT band. A injury to the peroneal muscle may cause compensation injuries up into the IT Band. So be sure to perform stretches to release the IT Band.
Gluteal muscles – Since the IT band is formed from the deltoid complex (gluteus maximus, gluteus medius, and tensor fascia latae, problems in the IT band will affect hip function. So it is important to release the muscles of the gluteals with stretches and foam rollers.


Proprioceptive Training

Whenever an inversion sprain occurs, the injury is usually not restricted to just the ligaments, tendons, muscle fibers, and fascial fibers. Often, the embedded neurological structures within these soft-tissue structures are also damaged. These neurological structures (golgi tendon organs, muscle spindles, and joint receptors) perform an essential role in positional control. Any damage to these structures can have the effect of decreasing stability, which can lead to chronic ankle problems.
Fortunately this damage can be repaired with exercise protocols that involve balance and proprioception. Some of the proprioceptive exercises we use with our patients at the clinic are:
One-legged Stand
This is a good initial exercise to try, with a slow progression into partial single leg squats. Do all of this exercise within a pain free range-of-motion.
Wobble board training
Slowly increase the difficulty of wobble board exercises from the two-legged balance exercises, into a single-leg exercise that combines full-body motions. Once you are ready, you can even try the single-legged version with your eyes closed. Note: The eyes-closed version should only be attempted after you are fully recovered and you are ready to work on increasing athletic performance.
· Upside Down Bosu Ball
The Bosu Ball is a great device for dynamically stretching and strengthening the ankle. Try this Side-to-Side Peroneal Stretch.
§ Turn the Bosu Ball upside down, balance on the flat surface, with your feet about shoulder-width apart.
§ Shift your weight to the right side so that the right edge of the Bosu Ball almost touches the ground. Then immediately shift your weight to the left side so the left edge of the Bosu ball almost touches the ground. Continue to shift from side-to-side. As you do this exercise, you should feel a stretch in the muscles along the lower outside of your leg (peroneals).
§ After a few minutes of performing this action your lower extremity muscles should start to feel fatigued.
§ Once you become comfortable with balancing the side-to-side actions, you can start integrating arm actions into this exercise. As you shift your lower extremity to the right side, swing both your arms to the left. When you shift your weight to the left side, swing your arms to the right. This simulates a downhill skiing (cross crawl) type of action that integrates all the muscles of your body.

Sport Specific
If you are involved in a particular sport, take the time to create a balance/proprioceptive exercise that matches your specific sport. For example:
· If you are a soccer player who is rehabilitating a sprained ankle, you may want to try one-legged stand on the injured ankle, while kicking a soccer ball with the other foot. To increase the level of difficulty, try standing on a balance pad with the injured leg, and then kick the ball with the other.
· If you are a dancer suffering from an inversion sprain, try moving through your basic dance positions while on a wobble board or balance pad.
· If you are a basketball player, try standing on a wobble board with the injured leg and practice throwing hoops.
Be creative with your individual sport. Use wobble boards, balance pads, half-foam rollers, or bosu balls to rehabilitate the damage to your nervous system that is caused by an inversion sprain.

Bottom line - inversion sprains are a common, yet complex, injury. This injury can involve multiple structures across numerous joints, and may even extend a considerable distance up the body. To correctly rehabilitate the injury, you must use an approach that takes into consideration musculoskeletal connections, the nervous system, and appropriate tissue remodelling.

If you would like more information or to purchase our books please go towww.releaseyourbody.com . 

If you would like information about our clinic in Calgary Alberta please go to www.kinetichealth.ca.


(COPYRIGHT KINETIC HEALTH 2012 – ALL RIGHTS RESERVED)

Tuesday, September 7, 2010

Ankle Sprain (Inversion Sprain) – Part 5


Exercise Rehabilitation For Ankle Sprains
When prescribing ankle exercises, we must take into consideration the multiple structures that are involved in performing and coordinating ankle motion. To attain a full resolution from an inversion sprain, we must be sure to consider multiple muscles and complex fascial layers, all of which work together across numerous joints.
To do this, we must be sure to address three essential components: strength, flexibility, and proprioception.
Strengthening the Ankle

Strengthening exercises are essential! Manual therapy, by itself, will not fully prevent an injury from returning without the addition of strengthening exercises. This is because the type and quality of tissue remodeling that occurs after an injury is dependant on the type of forces that are applied to that tissue. When appropriate strengthening exercises are applied, the collagen remodels to withstand the stresses that are placed upon it. The possibility of re-injury is very high without appropriate strength training.

Strengthening exercises for an inversion sprain can be subdivided into several categories depending on the stage of the injury. The following subcategories describe stages from non-weight-bearing to full-weight-bearing. Note: These are examples of possible recommendations, but actual exercise recommendations will vary from case to case.

1. Active Range Of Motion (AROM) – Non-weight bearing exercises
a. Four basic foot motions – Perform the following four basic motions: plantar flexion, dorsi flexion, inversion, and eversion. Perform these foot motions slowly, holding the end range of each position for 5-10 seconds. Repeat the action several times.
b. Alphabet exercise – Use your foot to draw the letters of the alphabet in the air, allowing your ankles to rotate with each motion

2. Isometric strengthening of the ankle – Isometric exercises are performed in static positions (unlike dynamic exercises which are performed through a range of motion).
a. The Isometric Four – In this exercise, you need to resist each basic motion (plantar flexion, dorsi flexion, inversion, and eversion) of the ankle. For example:
· Start with your ankle in neutral position, with your foot braced against a wall or table.
· Then, without allowing your foot or ankle to move, try to perform each of the four basic actions. This causes all the muscles involved in the action to contract.
· Hold this contraction for 5-10 seconds and relax for about 10 seconds.
· Repeat this process for 4-8 repetitions, slowly increasing the number of repetitions.
· Repeat this routine for each of the four basic actions.

3. Resisted Strengthening of the Ankle – using Theraband or Tubing
a. Four-Way Resisted Tubing – In this series of exercises, we recommend using a theraband or tubing as you perform each of the four basic ankle motions. For example, with the inversion action:
· Attach a theraband around your ankle and attach the other end to a table or door.
· Against resistance, roll your foot inward (invert your ankle) and hold for 3 to 5 seconds.
· Repeat for 10 to 15 repetitions, increasing the number of sets from 1 set/day to 4 sets/day as you increase your ankle strength.
· Repeat this routine for each of the four basic ankle actions.

4. Partial Weight Bearing Ankle Exercise
a. Shifting Your Weight – In this exercise, lean against a counter or table, and try shifting some of your weight onto the injured leg. Start with just a few seconds of weight, and then increase this time, as the ankle permits. Repeat this exercise about 10 times. Be careful not to do too much, too soon.

5. Full Weight Bearing Ankle Exercises
Once the injured ankle is able to bear the full weight of your body, there are many exercises that will help to further strengthen the ankle. One of my favorites is the Eccentric Calf Raise.
Eccentric Calf Raises - One Legged
(Actually…these are calf drops, not raises)
In this exercise, the rising up portion is not that important. The key lies in the slow lowering of the body, as this builds strength without causing further injury to the body.
· Stand on the edge of step or curb, heels hanging over the edge of the step, and rise up on both legs in a classic calf raise.
· Now, using only one leg, slowly drop down to the starting position for a count of three
· Do 5 to 15 repetitions in each set. Start with two sets and gradually increase to 4 sets as your ankle strength increases.
· Allow your ankle to build up its strength slowly. Do not increase your repetitions and sets until you can complete each repetition with perfect form, and without pain.

Once you are able to properly perform full weight bearing exercises, you should consider beginning a routine that exercises your full body. These exercises should activate the knee, hip, and core.


In Part Six of Ankle Sprains we will cover stretching and proprioceptive exercises for resolving ankle sprains.


If you would like more information or to purchase our books please go towww.releaseyourbody.com . 

If you would like information about our clinic in Calgary Alberta please go to www.kinetichealth.ca.


(COPYRIGHT KINETIC HEALTH 2012 – ALL RIGHTS RESERVED)